

Imagined Worlds Environment Model
For my imagined worlds project I decided to go with 3D modeling over 2D art. I am very interested in 3D modeling and I took this project as an opportunity to create a big modeling project. In the past I have struggled with 3D modeling. My topology often ended up messy and it would take me a long time to model simple objects. My hope was that this project would act as a learning experience to make me more confident with 3D.
The theme of my world is an industrial dystopia. The idea is that the country has had an industrial revolution of sorts and that new technology is being added to the old buildings. It would be a grim setting, with a corrupt government similar to Soviet Russia. I also took inspiration from both 'Half Life 2' and 'Dishonored'. These games both feature a similar art style to what I had in mind. The plan was to create a street - using european architecture - and then add the fictional elements afterwards.
I gathered a selection of images of streets from european cities like Paris and St. Petersburg. These were used as reference for the designs of the walls buildings and the layout of the streets.
 |  |  |  |
|---|


I then created some rough thumbnail art of my scene. The idea is that an electric carriage system runs above the streets for the rich to travel in. There will be industrial elements like wires and poles that run between the buildings. I also plan to add elements like propoganda posters, megaphones and litter that emphasises the oppression of this world and the poverty in the streets. A lot of the detail I describe is not depicted in this concept art. I decided to keep the plan basic and then add more elements as I got into the flow of modeling.
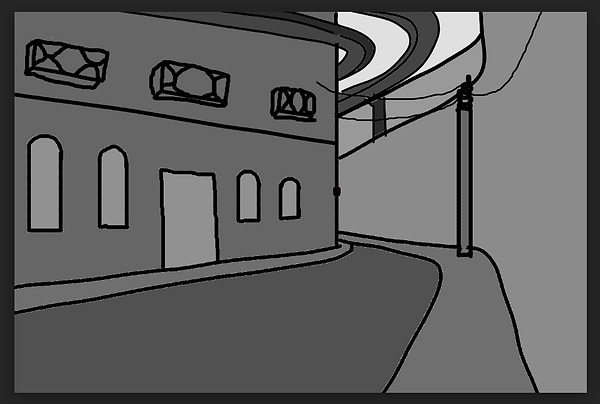
I then created some rough thumbnail art of my scene. The idea is that an electric carriage system runs above the streets for the rich to travel in. There will be industrial elements like wires and poles that run between the buildings. A lot of the detail I describe is not depicted in this concept art. I decided to keep the plan basic and then add more elements as I got into the flow of modeling.

This is a blockout for my scene that I made in Maya in order to give me an idea of the perspective of the image. I changed the colours of the objects simply to make it easier to seperate the buildings from the road. After this I began creating my first building. I used some of the street images as reference for this, roughly basing the architecture on elements from the images.
Building 1


I started with a cube and created the wall details with the extrude and multi cut tools. I started to make a single segment of wall and planned to duplicate them to create a full building. I did not realise at the time but I was already making mistakes. You can see in the images that some edge loops are not complete, and if I looked closely I could find many issues that I had seen in the past: multiple edges inside eachother, unconnected edge loops and vertexes in the middle of edges with no connections. As I continued working on the model I spent a lot of time trying to understand these issues and why they occured, which I will get into shortly. I was thankfully able to iron out these issues by the end and I am very happy with the final topology.


As I continued to work on the model I added detail and tried to iron out the topology issues. I discovered some of the reasons for my mistakes. I often extruded edges without much thought and I did not realise that this created issues with my edge loops, as extruded edges next to eachother were not connected. I discovered the merge tool, where I could select two vertexes and combine them together along with the edges. This helped me to clean up my mistakes from earlier and I kept this in mind for the rest of the model, making frequent use of the tool. This tool was almost revolutionary for my modeling. Rather than extruding messily, leaving faces inside the model, I could now make edge loops and connect parts together rather than jamming them next to eachother. I also found that the issue of multiple faces inside eachother was due to the misuse of the extrude tool. I would often select faces, extrude, then cancel it to try again - but I never properly undid the extrude. This meant that the face was technically extruded but I had not moved it, meaning that there were now two overlapping face. This was a difficult one to fix as I had to look for where I had done this, pull the faces out and delete them. After figuring all of this out and fixing it I felt a lot more confident with my modeling going forward.


I continued working on the wall segment. Most of this was done using the extrude tool. I selected a line of edges and used shift + move tool to extrude them all together, moving and rotating them to create detail. The extrude tool was useful throughout for detailing the wall.
I continued working on the wall segment. Most of this was done using the extrude tool. I selected a line of edges and used shift + move tool to extrude them all together, moving and rotating them to create detail. The extrude tool was useful throughout, both for creating indents and extrusions in the wall. I also used the bridge and fill hole tools to connect sections together and adjust the topology.


Once the wall was done I moved onto extending the wall. I had hoped that this would be quick and easy, but it was a bit more time consuming than I expected. I duplicated the wall, combined the two objects and deleted faces so that they would fit together, and then had to come up with a way to connect them. The bridge tool would not work as the edges were not identical. I had to again use the merge tool, placing the two objects next to eachother and merging each vertex in parallel. I then spent some time tidying up any prevalent toplogy issues.

This is the final model. I am happy with how it has turned out and I think it will be an effective part of my imagined worlds piece. I am glad that I was able to keep the topology neat and I will strive to keep this consistent with the rest of the project.
Building 2

After this I began sculpting another building. This one was not very detailed as I planned to only show a small section of it in the final shot. I almost exclusively used multi-cut and extrude for this.

This is a second blockout I made using the new building. Doing this helped me get an idea of what the model would look like in the scene. I also added a drainpipe using a cylinder.
Building 3
I felt a lot more confident with modeling by now. This building is similar to the first one, but it took much less time.


I felt a lot more confident with modeling by now. This building is similar to the first one, but it took much less time.
To add to the industrial theme I added wires between the buildings. At first I planned to use cylinders but it was difficult to get a convincing curve using soft select. I did some research and decided to use the EP curve tool, which allowed me to create a smooth curve. This tool was interesting as it did not create polygons and needed a few steps to convert it:
Curves > EP Curve
Generate > Curve Utilities > Attach Brush to Curves
Modify > Convert > Paint Effects to Polygons
Right Click > Assign Existing Material

This is what the full picture looked like now. I was happy with how this looked so I decided to spend some time applying UVs and fixing topological issues.

This is what the full picture looked like now. I was happy with how this looked so I decided to spend some time applying UVs and fixing topological issues.

Most of the buildings were fine, I was able to UV them quite easily without much distortion. I discovered the mesh > cleanup tool, which was very helpful for automatically fixing issues with topology.

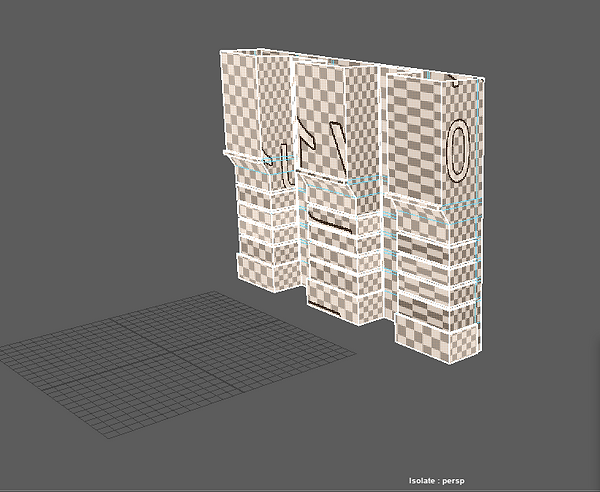
This building gave me some trouble, however. I did not know how to UV the sides. I found a lot of broken topology in this building and decided to remake it. I think I rushed it a bit the first time around as I wanted to get the full environment sculpted quickly. This time around I was careful not to make any incorrect topology.

When I was finished I UVed it again and it looked much better.
During lockdown I was unable to work on this project due to Substance Painter not working. Below is a render of the project as it is:

Coming back to this project I had learned a lot about Maya from working on the synoptic project. I spent some time fixing topology issues. I still did not have access to Substance Painter, so I decided to try using Unreal materials. I exported the project into Unreal, and applied materials to the different surfaces.
